
Glute bridge exercises are one of the simplest ways to train hip extension for strength, but they only work well when your setup and progression match your body. If you feel bridges mostly in your low back or hamstrings, or you’re stuck using the same variation forever, this guide is for you.
The bridge is “basic,” yet it shows up in serious strength programs because it teaches you to generate force through your hips without needing heavy loads or complicated equipment. That makes it useful for beginners, lifters rebuilding after time off, and people who sit a lot and feel their glutes go quiet.
We’ll cover why bridges sometimes “miss” the glutes, a quick self-check, the best variations for different goals, and a practical progression you can actually follow. I’ll also flag common form traps that look fine on video but waste effort in real life.
Why glute bridges build strength (and why they sometimes don’t)
Bridges train hip extension, meaning your glutes help drive your hips upward while your trunk stays stable. That combination matters for squats, deadlifts, sprinting, and daily stuff like climbing stairs without your back doing all the work.
But bridges can feel ineffective for a few common reasons, and most are fixable.
- Rib flare and low-back takeover: If your ribs pop up and your pelvis tips forward, your lumbar spine extends instead of your hips extending.
- Feet too far away: You end up pulling with hamstrings. Many people need heels a bit closer to their butt than they expect.
- Not reaching full hip lockout: You lift “up” without actually squeezing the glutes into a controlled finish.
- Load or variation mismatch: If it’s too easy, you feel nothing. If it’s too hard, you compensate and feel everything else.
According to the American Council on Exercise (ACE), the gluteus maximus is a primary hip extensor, so positions and cues that improve hip extension mechanics often improve glute engagement as well.
Quick self-check: which bridge problem are you dealing with?
Run this checklist during a set of 8 slow reps. It takes two minutes and usually clarifies what to change.
- Do you feel your low back first? Try a slight posterior pelvic tilt before you lift, think “ribs down,” and stop at a height you can control.
- Do you feel mostly hamstrings? Walk your heels closer, keep shins closer to vertical at the top, and drive through midfoot/heel.
- Do your knees cave or flare out? Use a mini band above knees, aim for knees tracking over toes, keep feet planted.
- Do you cramp or lose tension at the top? Shorten range slightly, pause for 1–2 seconds, then come down under control.
- Can you hold the top for 20 seconds without shaking? If no, you may need more basic volume before you chase heavy loading.
If pain shows up (sharp, pinching, numbness, radiating symptoms), it’s smart to pause and consider asking a qualified clinician or trainer for an in-person look. Strength work should feel challenging, not sketchy.
Glute bridge variations, ranked by goal
There isn’t one “best” option, there’s a best match for what you need today. Here’s a practical map. Use it to pick your main variation, then add one accessory.
| Variation | Best for | What it feels like when it’s right | Common mistake |
|---|---|---|---|
| Bodyweight glute bridge | Learning form, warm-ups | Glutes doing the lift, solid core | Overarching low back |
| Paused bridge (2–3 sec) | Control, mind-muscle connection | Hard squeeze at lockout | Relaxing at the top |
| Banded bridge | Glute med support, knee control | Outer hips “on,” knees steady | Pushing knees out without hip drive |
| Single-leg bridge | Imbalances, stability | Hips level, glute burn on working side | Rotating or dropping one hip |
| Weighted barbell bridge | Strength with simpler setup than hip thrust | Heavy, clean reps, strong lockout | Rushing reps, bouncing off the floor |
| Hip thrust (bench-supported) | Max loading potential | Big glute tension near the top | Hyperextending at lockout |
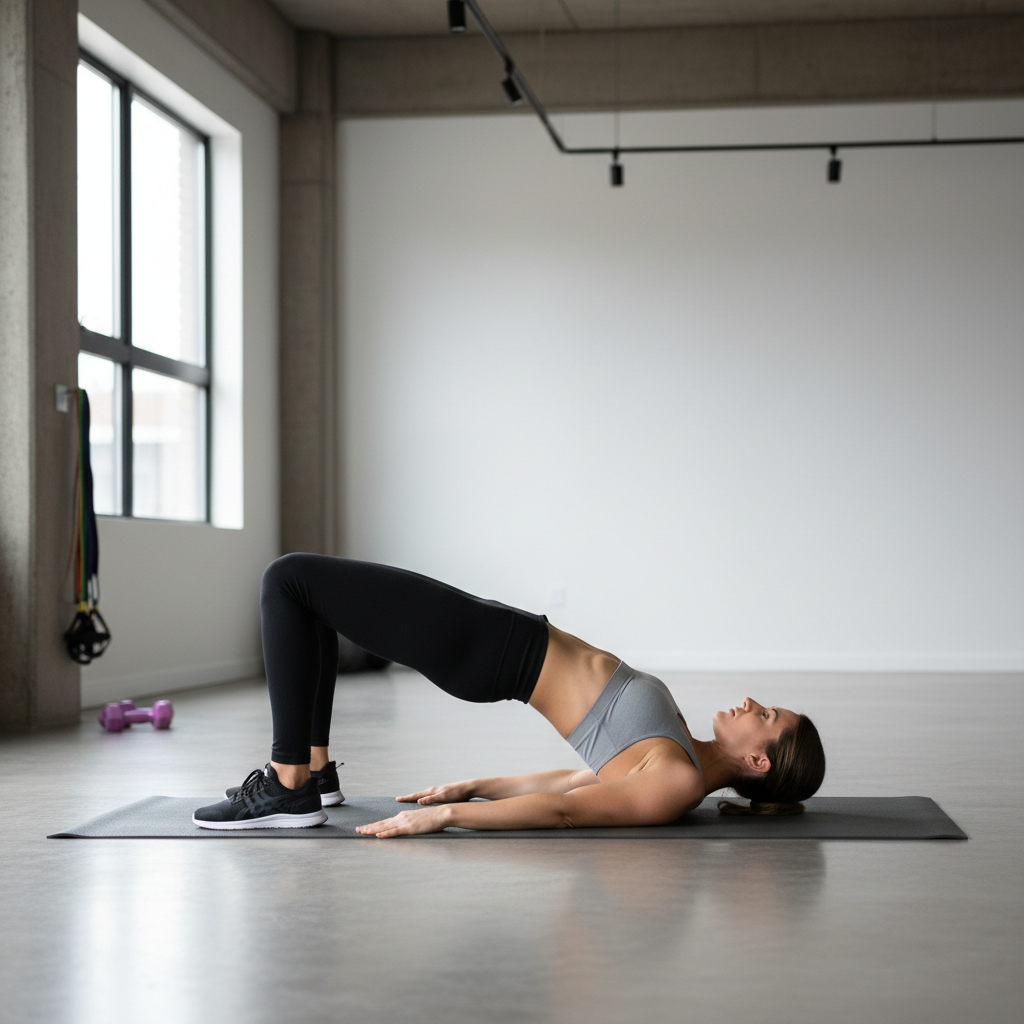
How to do the standard bridge correctly (cues that actually help)
The most useful bridge cue is boring: set your trunk first, then move your hips. If you skip that, you’ll usually “find” your low back.
Setup
- Lie on your back, knees bent, feet about hip-width.
- Heels generally land a hand-length from your butt, then adjust based on feel.
- Exhale gently, bring ribs down, think “zipper up” through your abs.
Lift
- Press through midfoot/heel, lift hips until you reach a strong squeeze, not a back arch.
- Pause 1 second and keep breathing, your ribs should not pop up.
- Lower under control, don’t drop and reset every rep unless you need to.
Key takeaway: A smaller range with clean lockout beats a higher bridge that turns into a backbend.
Progression plan: from beginner to strength-focused
If you want stronger glutes, you need progressive overload, but you also need repeatable technique. This is a simple 4-step ladder that works for many gym and home setups.
- Step 1: Bodyweight bridges, 3 sets of 10–15, slow tempo (2 seconds up, 2 seconds down).
- Step 2: Paused bridges, 3 sets of 8–12 with a 2–3 second hold at the top.
- Step 3: Add load, dumbbell or barbell across hips, 4 sets of 6–10, keep pauses short.
- Step 4: Choose your “strength” move, heavy bridge or hip thrust, 4–5 sets of 4–8.
Stay on a step until you can hit the top end of the rep range without your ribs flaring or your hips shifting. That sounds strict, but it saves months of doing extra sets that don’t carry over.
Programming ideas that fit real schedules
Most people don’t need a bridge marathon. Two to three sessions per week is usually enough, depending on what else you train.
If you lift heavy (squat/deadlift focus)
- Main: hip thrust or weighted bridge, 4x5–8
- Accessory: single-leg bridge, 2–3x8 each side
- Optional: banded bridge finisher, 1–2x15–20 for a pump
If you sit a lot and want better “glute on” feel
- Paused bridge, 3x10–12
- Banded bridge, 2x12–15
- Short walks or step-ups on off days, keep it easy

Common mistakes and safety notes (so you don’t waste sessions)
- Chasing height instead of tension: If you “win” extra inches by arching, your glutes lose the job.
- Letting knees drift: A little movement happens, but big wobble often means you loaded too fast or lost foot pressure.
- Going heavy without a stable brace: Load magnifies flaws, especially around the ribs and pelvis.
- Assuming burn equals effectiveness: A bridge can be productive without a massive burn, especially at low reps.
- Ignoring discomfort at the front of the hip: Pinching can mean your hip position needs adjustment, stop short of the range that aggravates it.
According to the National Strength and Conditioning Association (NSCA), good strength training balances load progression with sound technique and appropriate recovery, which is exactly the mindset that keeps bridges helpful instead of irritating.
Conclusion: make bridges work by picking the right variation
Glute bridge exercises work when your trunk stays stacked, your feet position supports hip drive, and you progress from control to load without rushing. If your current bridges feel “off,” fix the setup first, then choose a variation that matches your goal instead of forcing the heaviest option.
Action step: In your next workout, film one set from the side, check for rib flare and hip lockout, then run the 4-step ladder for four weeks and reassess.
FAQ
How often should I do glute bridge exercises for strength?
Many people do well with 2–3 sessions per week, especially if bridges support squats or deadlifts. If you lift heavy lower body twice weekly, one additional lighter bridge day often feels like enough.
Why do I feel bridges in my hamstrings instead of my glutes?
Feet are often too far from your body, or you’re pulling with your heels without reaching a clean hip lockout. Bring heels closer, keep ribs down, and pause at the top with a hard glute squeeze.
Are hip thrusts better than bridges?
Hip thrusts usually allow more load because of the bigger range and bench setup, but bridges can be easier to learn and easier on some backs. In practice, bridges are a solid stepping stone or accessory even if thrusts are your main strength move.
What’s the best glute bridge variation for beginners?
A slow bodyweight bridge with a 1–2 second pause is hard to beat. It teaches control and helps you feel whether your back is taking over before you add load.
Can I do glute bridge exercises if I have back pain?
It depends on the type of pain and what triggers it. Many people tolerate bridges well when they keep ribs down and avoid overextending, but it’s wise to check with a qualified healthcare professional if pain persists or radiates.
How do I know when to add weight?
If you can do 3 sets of 12–15 with stable ribs, level hips, and controlled tempo, adding load usually makes sense. If technique changes the moment you add weight, back off and build more reps first.
Do bands make bridges “more effective”?
Bands can help you keep knees tracking and cue the outer hip muscles, but they don’t replace hip drive. Use them when you tend to cave in or lose alignment, not as a default for every set.
If you’re trying to choose between bridge variations, or you want a simple plan that fits your equipment and time, a coach or physical therapist can help you match the right glute bridge exercises to your goal while keeping form and comfort in a good place.